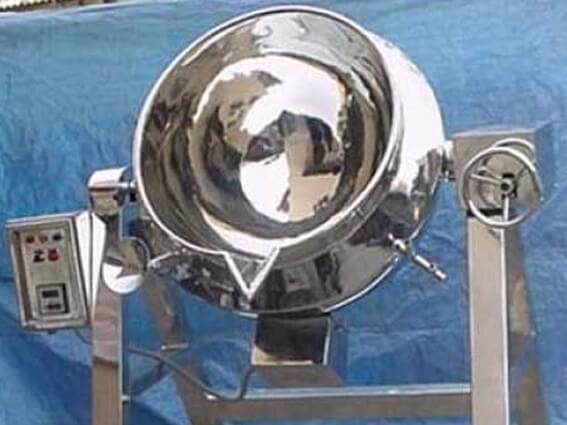
Cleaning, Operation & monitoring of Vacuum leak test machine
PURPOSE: To lay down the procedure for cleaning, operation & monitoring of vacuum leak test Machine.
SCOPE : This SOP is applicable for cleaning, operation & monitoring of vacuum leak test machine at SVP manufacturing facility
References : User manual of Vacuum Leak Test Machine
Attachments
Attachment-I Vacuum Leak test machine Log Book
Attachment-II Challenge test of Vacuum Leak Test
RESPONSIBILITY:
Production Person:
To verify that employees are trained before performing or operation any task relevant to this SOP.
To Maintained the record.
Production Head:
To ensure the compliance of SOP.
Quality Assurance Persons
To verify that all the instructions are followed properly as per the given SOP.
To ensure implement of the SOP.
Definition
Leak Test : Leak test is the process to detect the weak part of body or joints in the container by means of vacuum. This process is carried out in the vacuum chamber with an adjustable process cycle time.
Abbreviations
SS : Stainless Steel.
IPA : Iso Propyl Alcohol
BMR : Batch Manufacturing Record
HMI: Human Machine Interface
PLC : Programmable Logic Control
PROCEDURE:
Cleaning:
Before start operation, clean the S.S chamber properly with IPA 70% solution.
Clean all the trays with IPA 70% solution and lint free clothes.
Clean outer SS body of vacuum leak test machine with IPA 70% solution.
Check Points:
Check the vacuum leak test area is properly clean.
Check vacuum leak test machine is properly clean from inside as well outside.
Check there should be on other or previous product ampoules should be there in the area and vacuum leak test chamber.
Check and verify that vacuum gauge is properly calibrated.
Cheek the door gasket of the chamber is not damage or torn, and is properly grease.
Check the level of vacuum pump oil it should be sufficient before operation.
Check the HMI/PLC of the vacuum leak test machine is properly working.
Check the vacuum release valve, drain valve of chamber is working properly.
Check 3 phase supply of 415 V AC 3phase supply is available.
Operation
After getting line clearance from QA, open the vacuum leak test chamber.
Arrange the ampoules/respules containers/cassettes (5 ml, 10 ml, 20 ml, 30 ml) vertically in ss perforated trays as per the loading pattern.
Load 5 trays in each lot as per as per following loading pattern.
| Ampoules Size | Ampoules per tray | Total No. of Ampoules in one lot of 5 trays |
| 5 ml | 1600 ampoules | 1600 x 5 = 8000 |
| 10 ml | 1600 ampoules | 1600 x 5 = 8000 |
| 20 ml | 1200 ampoules | 1200 x 5 = 6000 |
| 30 ml | 1000 ampoules | 1000 x 5 = 5000 |
Close the front door of chamber & tightened with the locks.
Check the emergency switch is in release position.
Switch “ON” the “MAINS” electrical supply of leak test machine.
Then switch “ON” the control panel & HMI will start.
Keep the emergency switch in release position.
Enter the detail of product name, batch no., quantity, cycle time.
Start the operation in “Auto/manual mode” with the HMI & run the cycle.
Cycle time of each batch is 20 minutes which will cover in two vacuum cycles of 10 minutes.
As the cycle start vacuum pump, timer of cycle will start & vacuum creation process in chamber start.
Chamber rotate at 180 ºC in one direction & vacuum create up to -760 mm hg in the chamber.
After completion of 10 minutes chamber reaches to his original position & chamber vacuum release up to zero.
Then second vacuum cycle start & chamber rotate to other direction of 180 ºC & same vacuum create up to -760 mm hg.
After completion of 10 minutes chamber reaches to his original position & chamber vacuum release up to zero.
On completion of vacuum cycle collect cycle print out & attached in BMR.
Open the chamber & unload the trays & check each container for leakage.
Drain out the leak container solution in chamber by opening the chamber bottom drain valve.
Load another lot of ampoules & run the sample cycle.
Separate out each lot rejection containing total empty, half empty container, less volume
containers in red colour rejection box, count them & mention in BMR & good ampoules transfer for visual inspection.
After completion of complete batch vacuum cycle switch off the machine, clean the chamber with purified water & rinse with bottom drain valve in drain to avoid any previous product traces.
Get the line clearance from QA & run another batch cycle.
Maintain the operation record as per Attachment-I.
Vacuum Leak Challenge Test :
Take 100 cassette of good (already leak tested) filled & sealed ampoule.
Out of them select 20 cassettes of ampoule and make a small pinhole with syringe (22 gauge/23 gauge/24 gauge) in each cassette .
Mark the pin hole ampoules & keep in between the lot & run the cycle as per the operating procedure.
On completion the vacuum cycle production & QA person will verify each all ampoules to challenge the machine to detect the pin hole ampules.
All the pinhole marked ampoules should be complete empty/partial empty.
Run three cycle & record the observation
Frequency: Quarterly
Attachment-I
VACUUM LEAK TEST MACHINE LOG BOOK
Content : Date/Product/ Batch No./Lot /Cycle Time ( Start/end)/ Vacuum press./Done by/Checked by
Attachment-II
CHALLENGE TEST OF VACUUM LESK TEST MACHINE
Product Name & Batch No. / Date:\
(A) Total Cassette of ampoules
(B) Ampoules per cassette
(C) Total Ampoules for leak test challenge
(D) Syringe gauge size -22 gauge/23 gauge/24 gauge
(E) No. of ampoules with pinhole
(F) Leaked ampoules detected after vacuum leak test = D x 100/C = ____%
(G) Observed Rejected Ampoules in percentage (NLT 100%)
(H) Result : Pass/Fail
Frequency : Quarterly


